This latest update adds several new features and improvements to web and mobile, including:
Highlights
-
Sort Assets and Send to Maintenance on the TrackAbout Mobile 7 app for Android and iOS
-
Centralized Custom Asset (CAI) management that lets you create and edit CAIs directly from the List Custom Property Values page
-
POD order list filtering to keep old orders and orders from completed trips from being displayed in TrackAbout Mobile 7
-
Format changes and new options for Bulk Load Users
Sort Assets with TAM7
Previously only available in TrackAbout Mobile 6, Sort Assets (aka Inspection Scan) is now available in TrackAbout Mobile 7 for iOS and Android.
The Sort Assets action lets you scan multiple assets to mark that they’re ready for filling or another action (by changing their use state). As part of the review, you can flag them for follow-up maintenance (using an integrated Send to Maintenance action).
To use Sort Assets:
-
On your mobile device, click the Sort Assets button (button wording may vary).
-
If you’re using work orders, you’ll see a Work Order Priority screen first, where you can see the relative priority values of your assets.
-
Next, on the Sort Assets screen, scan the assets you’re reviewing.
-
Assets are displayed as you add them. The information displayed along with an asset is configurable.
-
If Send to Maintenance has been configured and enabled, click the “three dot” icon (on Android) or the file icon (on iOS) to send assets to maintenance.
-
When you’re done, click Save.
Sort Assets is included as part of the TrackAbout Tracking module but must be configured and enabled before it can be used. If you are interested in using the Sort Assets action as part of your workflow, please contact TrackAbout support.
Send to Maintenance comes to TrackAbout Mobile 7
The Send to Maintenance action (aka Flag for Maintenance) is now available in TrackAbout Mobile 7 (iOS and Android).
Send to Maintenance lets you flag a single asset at a time for maintenance and record the reasons why maintenance is needed, all in one action. This can be useful for times when maintenance can’t immediately be done, or maintenance is routinely handled by others.
To use Send to Maintenance in TrackAbout Mobile 7:
-
Click the Send to Maintenance button (button wording may vary).
-
Scan or key-in an asset to select it. Note: Send to Maintenance can’t be used with containers.
-
Specify the reason(s) the asset needs maintenance from a checklist. The list of reasons can be customized during initial setup to include your routine maintenance reasons.
-
Save.
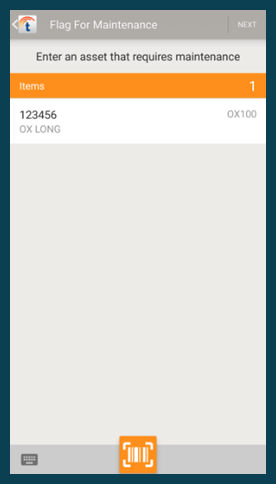
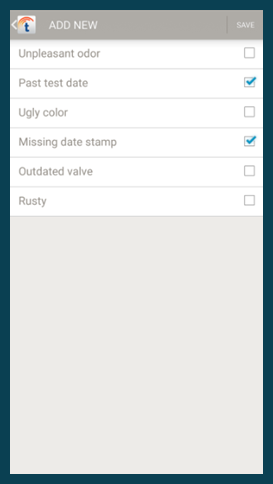
This sets the status of the asset to maintenance and can be customized to trigger follow-up actions within maintenance based on the provided reason(s).
Send to Maintenance is included as part of the TrackAbout Tracking module but must be configured and enabled before it can be used. If you are interested in using the Send to Maintenance action as part of your workflow, please contact TrackAbout support.
Centralized Custom Asset Info Option (CAI) Management
You can now manage the custom property values of your custom property types (CAIs) from a single page.
List Custom Property Values
Jump to: List Custom Property Values
View, edit, disable, and add new CAI values to existing custom property types.
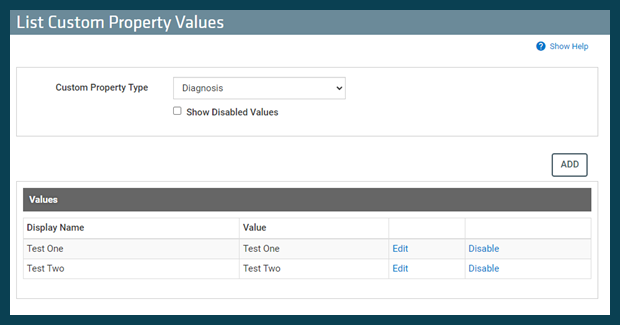
NOTE: Custom Property Type and Custom Asset Info (CAI) are synonymous.
Custom Property Type Select an individual custom property type to display the values associated with it for further action. Select “All” to display the values associated with all your active custom properties. (Check Show Disabled Values to display inactive property types along with active ones.)
ADD Create a new value for the selected custom property type. Open Create Custom Property Value. (This option is not available if Custom Property Type is set to “All”.)
Values – Lists the values associated with the selected custom property type.
-
Display Name - The name of the value.
-
Value - The value’s default setting.
-
Enabled - When Show Disabled Values is checked, this tells you if the value is enabled or disabled.
-
Edit - Make changes to the value. Opens Edit Custom Property Value.
-
Disable - Click to disable the value.
-
Enable - Click to enable the value.
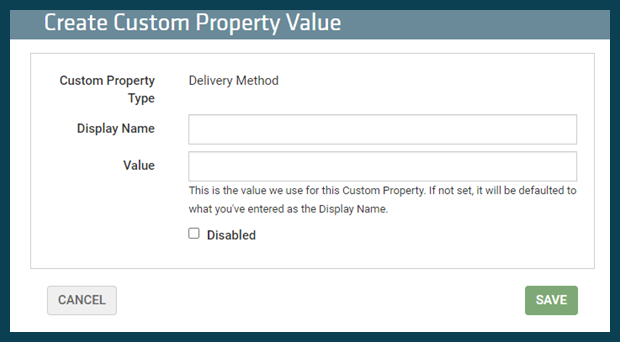
Create Custom Property Value
Create a new custom property value for a selected custom property type.
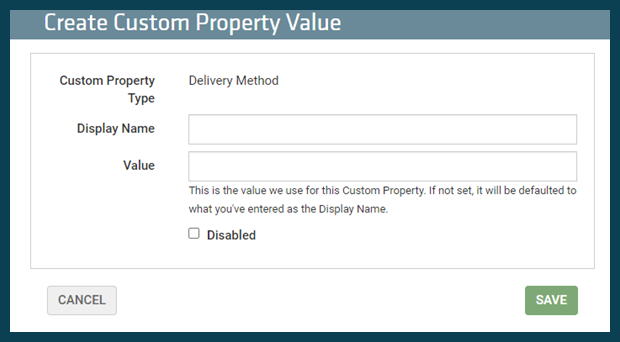
Custom Property Type The name of the property type you’re creating a new value for.
Display Name A name for the value.
Value A default value for the property type. If you don’t specify a default value, the value’s Display Name is used.
Disabled Check to disable the new value on creation.
CANCEL Click to not create the new value.
SAVE Click to create the new value.
Edit Custom Property Value
Edit an existing custom property value for a selected custom property type.
Custom Property Type The name of the property type the value you’re editing is associated with.
Display Name The value’s name. Editable.
Value The default value. Editable.
Disabled The value is disabled when checked. Editable.
CANCEL Click to abandon changes.
SAVE Click to save the edited value.
Filter Old Orders and Orders from Completed Trips in POD Order Lists on TAM7
You now have the option to hide the following types of orders from being displayed in POD order lists on TrackAbout Mobile 7.
-
Orders from completed trips
-
Orders with planned delivery dates that are more than a specified number of days in the past
If you’d like to hide either or both these types of orders, please contact TrackAbout support.
More Flexible Custom Actions
Dynamic Forms can now come anywhere in a custom generic action, not just at the end, making TrackAbout’s Dynamic Workflows even more useful and generic actions more adaptable to your workflow.
If you’re interested in having your existing custom actions modified to take advantage of this new flexibility, or to add new custom actions to your workflow, contact TrackAbout sales or TrackAbout support.
Bulk Load Users: Format Changes and New Options
Bulk Load Users (Jump To: Bulk Load Users) lets you add and make changes to internal users in batches instead of one at a time using a specially formatted Excel workbook.
With this release, we’ve tweaked the format of the workbook to make it even easier to use by merging the Roles and Permissions worksheet into the User Information worksheet.
We’ve also added an option to let you select how users are identified in the workbook.
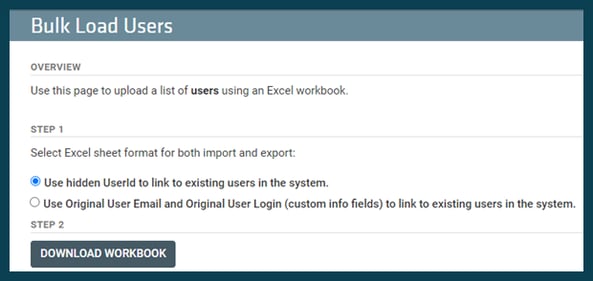
Select “Use hidden UserId to link to existing users in the system” to output a workbook which associates users in the system with their hidden UserID. This is the default selection and the option you’ll want to use for bulk user updates in most cases.
Select “Use Original User Email and Original User Login (custom info fields) to link to existing users in the system” to output a workbook that associates users in the system with their original email address and username. This workbook includes two additional columns in each worksheet, CustomInfoOriginalLogin and CustomerInfoOriginalEmail. This format is useful for making bulk changes to disabled users. NOTE: To work properly, this option requires specific custom fields be added to your TrackAbout. If you’re interested in this option, contact TrackAbout support for details.
For full details on the columns in either version of the workbook, see the Bulk Load Users page.
Korean Language Support
TrackAbout.com and the TrackAbout Mobile 7 app (for iOS and Android) now support the Korean language.
Quality of Life Improvements
-
Having multiple lines in an order with the same product code no longer causes Branch Transfer Send on TAM7 to error out.
-
An issue for some users that caused TrackAbout to stay in a “TrackAbout is working hard” state for an excessive length of time when saving an edited product code has been corrected.
-
Exports of Asset Searches by location-restricted user no longer inadvertently contain assets outside the user’s location.
Got questions? Please contact your TrackAbout Support team at support@trackabout.com. We'd love to hear from you!
.png)

.png)

